Showing posts with label Coloring Tutorial. Show all posts

Thursday, April 18, 2013

Coloring blue hair tutorial on MIC Twinkles Fairy

 HIYA GUYS miss me? I got sick but I'm doing much better now and getting back to my coloring.

 I missed my Saturated Canary post so I owe you guys an extra creation, sorry :)

I decided to post this tute thats been sitting in my drafts since last year lol!! Yeah this tute was published on the Spectrum Noir blog last year (or was it in Jan this year??) but I never did get a chance to showcase it here nor did anyone get to see what I did with her. This card ended up at the CHA Winter 2012 show at the Spectrum Noir booth. 
I saw a few pictures of people holding my card lol!!! So cool lol!

I used Make It Crafty Fairy Twinkles DIGI and also how cool does the Flower Leaf Swirls Laser chipboard looks all sparkly! 
Obviously all colored with Spectrum Noir markers


I hope you forgive me for not sharing last year but can I make it up by sharing the coloring tute lol! I hope it's useful to you and want to give it a try on how your DIBBS does blue hair for touch of texture with the white thin strands.
Thanks for stopping by and I'll be back on Saturday for TWO posting yes TWO LOL!!!


**********************************************************

Blue Hair Tutorial

 I think adding an undertone shade gives a realistic texture to the hair.
These are my markers for this combo:  IB2, BGR2, IG3, BT2

STEP 1: start adding undertone shade with IB2. Flick outward and move around your image for an easier and finer stroke. Do this all around the top of the hair, the bottom portion to the middle and this is optional add random flicks in the middle of strands. I do that to add more depth and interest to the hair.


 STEP 2: Now add BGR2 on top of all the flicks already laid. Straight on top and as done before. The only different thing we're doing now is slightly longing the flick. Now the BGR2 will be SLIGHTLY longer then our IB2


Step 3: Now we go back and add IB2 again straight on top as the other colors. Don't forget to flick a little longer than before.

Step 4: Now to add shading with IG3 and I tend to start from underneath the hair bangs , were the flicks start and on the top crown of the head.
Now due to bad lighting I didn't take a picture of me laying the BT2, but I laid it down right on top of all the colors and no need to make it longer just add it gently as if you were starting all over from step 1. Then let's mute it with BGR2, same thing no need to long it.
From this point it's a back and forth process. The reason I do this is to not loose the under tone and bring back that blue we originally laid. I then went back with IB2 and IG3  being my final touches.


Final result Is a fun blue hair chickie.

 Another tip I could give you, to keep thin strands is keep a consistent pace. Keep a pattern going as far as laying your markers. If you have to write them down to remember what order they were used that's a plus. Also when adding your flicks, introduce your following shade carefully along the side of the flick already there. Soon you will end with white highlights or you could fill with the lightest  color of the group family for instance on this blue combo I could of used BT1.


And that's how I achieve my blue hair coloring.
I hope you found my tute easy to understand and remember with patience and practice practice practice.
It will be worth it at the end.

Is there something you'll like to see me color or take on a technique using Spectrum Noir let me know. I now have a better camera and the pictures will be better, I hope lol! 

HUGS
Ruby

Monday, December 3, 2012

Guest designer for Simply Betty whoot whoot!!

HI guys! Happy Monday and I'm so excited to share today's creation and a quick coloring tute on how I took on this cool dude.
Thanks Betty for the guest invite to the challenge blog. I was tickled to hear of the challenge theme and she was a sweetie to acknowledge me as the technique originator aka founder ROTFL!!!

Anyways thanks hun for having me. (Her images rock, I love her style and her coloring is jaw dropping!)
Also quick kudos to the lovely Corinne for all your help and you certainly ALSO bring your awesomeness talents to the table GF :)

ok so.... I was invited to share a quick movement technique and this is what I've created using winter Christian available at the Simply Betty store.


ok so you want to see how I did it. 
Again this is only a coloring tute and YES, I will be doing a full tute. Once I get a hot hot image in my hands. I'm off to work on it right away. ((smiling big)) I have a special image coming for my tute whohooo!
ok let's color....so

FIRST STEP: color your image like you normally do. I suggest you write them down IT HELPS A LOT! 
I color with Spectrum noir pens and this is my recipe 
Step 1 recipe
Skin: TN1, TN2,EB1,EB2
Hair: EB1,EB2,BG5,BG10
Jacket: CG1,CG3,CG4,,DG3
Pants: TB1,TB4,TB5,TB6, True black
Glasses: IB1,TB1,TB4,TB5
Gloves: GB8,GB9,EB1,EB2
Board: IG1,IG3,IG4,IG6

SECOND STEP: This is where the fun begins. Now you color the second image and start to eliminate the darker pens.
step 2 recipe
Skin: TN1, EB1, blender
Hair: EB1, EB2, BG5, blender
Jacket: CG1,CG3,CG4
Pants:TB1,TB4
Glasses: IB1,TB1,TB4
Gloves:GB8, EB1,EB2
Board: IG1, IG3, IG4


THIRD STEP: This would be the lightest image possible but yet visible.
step 3 recipe

Skin: TN1, blender
Hair: EB1, EB2, blender
Jacket: CG1,CG3
Pants:TB1,TB4 and blender
Glasses: TB1and blender
Gloves: EB2 and blender
Board: IG1, IG3
and you also add your lightest base color just outside the edge of the last image like hair is my EB1 ETC......


STEP 4: Now I started to create the "movement marks" by simply flicking to the back of the image. You start right behind the first image to the back.I flip around my paper to get a finer and long flick.
I used BG2, BG3 and blender for my flicks.
this is the final result and the blender really helps to smooth out the flicks. I always tend to go back and add color if I need to. The blender could loose some of the color but don't fright that's what gives the illusion.
I used MIC (Make It crafty) Laser chipboard and LD (Little Darlings)sentiment winter stamps.
and this is my creation using the cool Christian dude.
Stop by the challenge blog HERE  to check out more inspiration and CAN'T WAIT TO SEE WHAT THE TEAM HAS DONE WHOOT WHOOT!!

If you decide to give it a try can you please share with me. I would like to see what ya created and I would be very very thankful If you give me some kudos on the technique (puppy eyes here)
THIS WAS SO MUCH FUN WOW!
Betty Corinne thank you ladies((hugs))
Oh I forgot to mention....I'm having Internet connection problems (this post almost didn't happen lol) so I'll try to get online as soon as I can. I am anxious to check out more movement creations. 

LOVE YA GUYS!


Saturday, November 3, 2012

Make It Crafty Inspiration and Spectrum noir with tutorialal

Hey hey guys! Ruby here and my time has come to share with the MIC Inspiration blog and also on my Spectrum Noir DT.
  I have for you a little colored scene that I created using MIC Giant Flower. Everything is colored with Spectrum Noir pens and I'll be sharing the recipe down below along with a tute.

How I did it you ask? Well the background sky was a color combo blending back and forth. Nothing extremely difficult. Just playing with pens and making them blend together smoothly. The flower was fun and It did take lots of layering and blending. I wanted to give the flower a particular style with deep shading and  lots of flickering. All I did was flick from center outwards blend blend blend.

I wanted to give you a glimpse of the background scene alone beforehand.

and this is the complete scene created into a card.


 I have some pretty MIC Laser Chipboard ,"Swirly corners" and some of my pale purple flowers I colored with SN pen PL 4 purple to coordinate with my card.

I now have a tute down at the bottom, How I achieved the Undertone on this cute Mythical Nymph Toread name Flora :)

Make It Crafty Products

Spectrum Noir Recipe:
SKY Background: BT1, BT3, BT4,CT1,I G2
Flower: LV2, PL1, PL2, PL3, PL4, PL5
Stems:LY1, LG1, LG2, DG1, DG2, JG1, JG7, BG3, PL1, CT4
Ground: LG5,GB4, DG3, BG4
Mountains: TN1,TN2,TN5, EB5, EB7, GB9
Flora(sitting Image)
Skin: FS1, EB1, EB2, DG1, BLENDER
Hair: EB1, EB2, BG5, BG10
Horns: 1G1,1G2,EB2
Eyes: TB1,TB8
Dress: BT4, BT5, GT1, BGR4
Leaves on dress: LG5,CG2, FL3
Flower band on hair: TN1, FL2, LG5, CG2

***********************************

Now for the quick picture step tutorial to share!!

Do you want to know how I achieved a green undertone with pale skin coloring on Flora from the Toread line?

 This is another fun way to color skin on many stamps that portray a mythical fantasy-like image.

You can easily achieve the effect with just a few markers.
The markers you need for this tutorial are
FS1, EB1, EB2, DG1 and blender

Step 1 and 3 will be overall working on the undertone.

Step 1: Lay your undertone first with DG1, preferably where your shading is more likely to sit.


Step 2: Lay FS1 right on top of DG1 to add more depth.

Step 3: Add EB1 around the edge lines of the skin. Adding EB1 will help tone down the brightness from FS1 and keep all the other colors well muted.

For step 4 through 6  each time you lay a color you want to move to the next shade of color over less of the working area( such as highlighted parts)


Step 4 : Use DG1 To bring the undertone back.

Step 5: Pulling inward with FS1 and blender in a circular motion of highlighted areas.

Step 6: Lay EB2 around the edge lines to cast shadows.

This is the final result and I made an option of flicking small marks around the skin to add a realistic effect with CR3. I hope my method was useful and easy to understand. 

Have a great colourful weekend!

Lots of hugs and cheerful kisses
Ruby


Wednesday, September 26, 2012

Colors of Autumn!


LOOONG POST so be ready for my waffling!!
My MIC Cynthia post is right under this post or just click HERE.

Hello friends me again! Do you feel the fall breeze coming in?? I DO and it's my FAVORITE season!!! You give me my coffee turn on a seasonal candle and you have a happy Ruby all day!!!!
Although some days just feels like winter over here!!?? not fun :( 

I wanted to share my "Autumn" take for this month DT challenge at Little Darlings Inspiration blog.

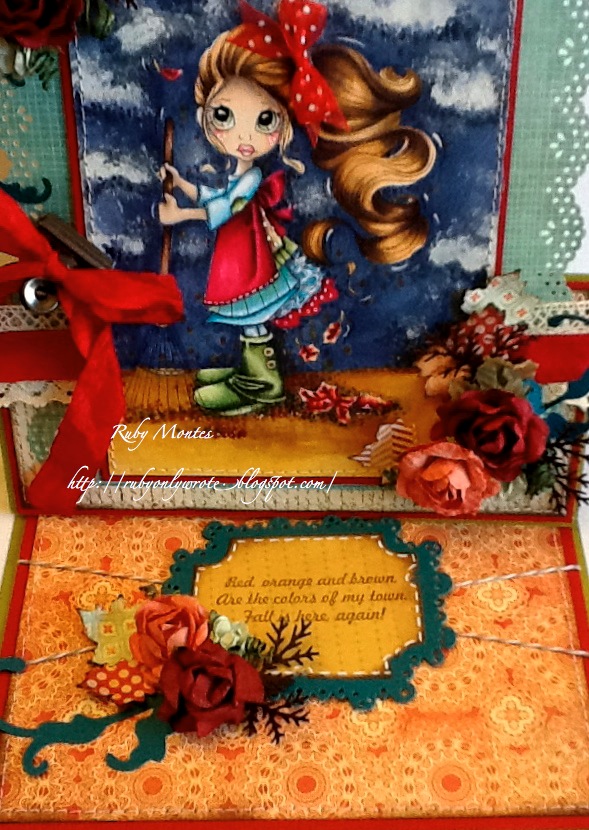
 Also it's my turn to share my tips and Ideas on the Spectrum Noir Inspiration blog. I have the oh so popular Saturated Canary,"Autumn". I'm showcasing her on a bright easel card with fun fall colors.
Here come check them out my pictures and now due to the size of the card. I had to get camera happy and take as many as possible in order to get all angles lol!


Look at that fun ponytail to color!!! I have colored her with my Spectrum Noir pens :)


My sentiment is from the Little Darlings Warm Fuzzies sentiment line "Fall Harvest" Collection designed by our lovely 
Mindy Baxter! I think it suits the card theme don't you think? 
"Red, Orange and brown are the colors of my town. Fall is here again"!

*************************************
As I mentioned to you it was my turn to share my tips and ideas on the SN team. Do you want to see how I colored her hair? Well come on back to this post because due to bad pixs I have to re-do the whole tute, LOL!!! 

You know what ...... let me just put the pictures I have now and I'll be back later to substitute them with crispier pixs.

I decided I wanted to keep the highlights in the center of her ponytail this time. My markers for this brown combo are EB5, EB8 GB2 and GB10


The first step is laying my EB5 where the shadows will more likely sit. Mainly under a falling curl, on the root of the head and where layers interlock.If you notice I only laid skipping pleats on her crown. That helps create a pulled back pony tail :)


Second, I take GB10 and pull the EB5 outward towards the center. Repeat over all the sections where you laid EB5.

Once you have done that,  go ahead and fill in the remaining white area with GB2.  Do not worry if it looks uneven at the moment.


Then repeat the same process, pulling outwards to the center, with GB2. Make sure you blend out from the edge of the darker color.

It is important you do not sit your light color on top of your darker colors, as you will loose your shading. 


Now to give it a smooth blend. I personally like the tip to tip technique with these pens because they are so juicy it makes it easy to just do it this way.


If you wish to pick up ink from Acrylic block or whatever other preference is good for you, that works as well.

We need to pick up a bit of the darker color (GB10) with our lightest (GB2). Again, use the same routine of blending outward to the lightest area.
Your final step should be going back and touching up your dark colors so you do not lose the shading USE EB8 FOR DARK SHADING.

and whala this is the result to a fun ponytail.
I hope I gave you some motivation in giving this a try. As always delighted to share my tips.
Happy Coloring!

Spectrum Noir Recipe

Skin: FS1, FS2, FS3, TN1, TN2
Hair: GB2, GB10, EB5, EB8
Boots: DG1, DG2, DG3, DG4
Leaves: GB3, TN1, DR1, DR2, DR4, DR6, DR7
 Dress: DG2, TB1, IB1,IB2, TN1,EB2,EB3,DR1,DR2,DR6
Lips: CR3,CR4
Floor Dotted Leaves: DG2, DG3, IG10, BG4, TN6, DR4
Ground: GB3, GB4, GB6, GB9, TN1
BACKGROUND: IG

************************************************

ATTENTION ATTENTION ATTENTION!!!

A special announcement! 

HAPPY BIRTHDAY ZOE!!!!!!!!!!!!!!! WHOOT WHOOT!!!!!!! WE WUV YOU Zoe!!!!

We thought it would be fun to share the excitement of today and as a fun way to get everyone involved we have a surprise for you!! Check out this image especially drawn for Zoe by Little Miss Muffet Stamps which features a Sweetheart dress for any occasion with a festive Gumnut flower sun hat. The Zoe hatter image will be available as a freebie for today only in celebration for Zoe's Birthday!! How cool is that??!! If you want to play along, just email Barbara at ForgottenScraps@gmail.com and as long as it's September 27th anywhere in the world then the offer is still open!! Share you're creations in the MIC FB Group too_ we'd love to see what you make!

Well that's it for me today and I'll be back sooner then you know it. 
Thanks for all your love, Ruby

CHALLENGES WHAT!!!!???? LOL!
Oh yeah playing today!!!!

Deep Ocean Challenge   more than two colors. Umm yeah got the whole rainbow here.
Crafty Sentiments Autumn colors


Monday, August 20, 2012

Magnolia-licious HOP Meets with My NEW DT :)


HI GUYS!!!

OMG It's been a while wow!
Well folks if your coming to visit me just because well guess what....... 

You just stepped into our 
Magnolia-licious Highlities monthly blog hop. 
So If you came from my VERY talented friend Patti Jo well then your right on track but If you wish to start at the beginning for more eye candy well then come HERE.

With this also I have a special announcement!!!!! 

YOUR READY.....

I...... 

AM..... 

NOW...... 

A.......

 DESIGNER............ 

FORRRRR...........

READY...........


YES!!!! What a wonderful opportunity I've been given so I'm taking it and I AM RUNNNNNING...(Like Forrest Gump lol!)

Thank you Jennie Black and DT MEMBERS for having me :)

Anywhoo I've been playing with my spectrum markers and GUYS THEY ARE SO JUICY AND LUSCIOUS! The color on my images are so vivid it's crazy.
I've been keeping this hush hush for a bit now and I'm happy that I finally get to scream it out :) 

I will be having more demos for you guys using these markers and what a better time to start now and since I'm the last on the Magnolia-licious Hop line up.

Then you could hang out with me for a bit whoohooo!!!

At the end of the post I will have links and recipe combo for today's showcase.

I created a Book Mark / Tag featuring my cute Tilda with gift for you. I needed to stay with the theme for the Magnolia-licious challenge which is "Back to School projects"


SO who wants to see how I colored her hair using my Spectrum pens on KRAFT PAPER :)

*******************************
Let the fun begin


Step #1 – Using TN9, randomly start by making some small curl strokes on the base of the head.  Do not go to far out because you want to leave the end of the lock lighter.


Step #2 – Using TN3, start by pulling out TN9 and again leave some hair left for a lighter tip on the curl.  Some strands are so short that dotting the color works also.

Step #3 – Using DR7, go back to the root of the head and create the same stroke on top of the original TN9.  Here, we are starting to preserve our shading.


Step #4 – Using CR1, color in all the untouched spots and ends of locks.  Everything should come together nicely.


Step #5 – Using IG6, dot some dark spots closely under the headband and under her hair line to enhance the deep shades.  The dimensional effect that it gives when you add the dark shading is so eye catching. 
and that's all is to it. I hope I have given you some boost to give it a try.

From now on I will try to do as many more demos as possible. If you want to see a specific technique using Spectrum markers please let me know. I'm game for any challenge.....uhhhhh Did I just say that lol!!!

I guess I did lol!!!! Let me know if you want to a color combo for example. A specific image from Magnolia, Little Darlings, Crafters Companion or Make It Crafty(my DT'S). Of course I would have to make sure I have them in my stash :)

Well here is another glance of the finish tag


here is how it comes apart with a corner book mark, baby tag and mother tag :)

*********************
Maybe slipping a thank you note to a teacher or some bribing money BAAAHAAA!!! JK!!!!

Speaking of School.
Guess who IS GOING TO SCHOOL OMG!!! I'm so happy but then the more I think of it. I start getting sad and with a big knot in my throat....SOPHIE.
My baby girl ... my last child :(  I'll be home alone now sigh..... she starts school on Tuesday but tomorrow is open house so she gets to hang out the classroom before the big day, OMG!!!!!!!!!!!!!!!!!!! I hate even saying it OMG!!! but it makes my heart hurt a little.
I do not like to show my tears when I walk them on their first day of school specially on their pre-k debut. 

Last thing I want is for them to feel scare or mainly embarrass of the crying sobbing lady walking them to school everyday lol!

I think I'm gonna brake this time though .... THIS IS IT!!! No more for me.
OMG!!!! I'm tearing already.
PLEASE PRAY FOR ME LOL! I am dead serious I'm weeping right now, lol! 

My Sophie is growing TOO FAST and btw we just celebrated her 4th bday on Aug 12. 
Oh we had so much fun but with this long posting as it is I owe you guys pixs. 

OK I'm signing off so make sure you join us for the Magnolia-licious challenge HERE and for more colouring tips using Spectrum Noir pens visit the blog HERE

HAVE A BEAUTIFUL WEEK!!! Oh and wish me luck on Tuesday. I'll be back sometime this week. I think something for the sweet tooth -_+ is in order.


*****************************
My coloring combos with Spectrum Noir pens available at Crafters Companion

Skin: TN2,TN3, FSI, CR1, CR5
Hair: DR7, TN3, TN9, CR1

Dress: TB1, TB3, TB4, TB6, BT1
Headband: DR4, DR6, DR7
Shoes: DR7, DR9, CR1
Socks: 1G2, 1G6
No. 1 Teacher tag: DR1, DR4, DR6, DR7, CR8, TB1, TB4, TB5
Present: DR6, DR7, GB4, GB11, CT1
Shading: 1G2, IG6

Magnolia product available at the 

Thursday, July 12, 2012

Lucy's Dirty blonde Hair


Did you miss me!!!??? Oh I've been in serious crafting mode lately. At he beginning of the week I had 9 projects to finish up for CHA. I am happy to announce I'm down to my last two. Once I started there was no stopping me. I can't wait to go to CHA....WHOOHOOOO!!! 

BUT for right now let me share with you one of the latest NEW MIC IMAGES AVAILABLE at the store NOW!!!!!!!!! OMG I just fell in love with the features on their face.UGH TOOOOO CUTE!!!!
It was my turn to share on the MIC store blog and I decided to share how I colored Lucy's dirty blonde hair. Not that her hair is dirty but .... You know what I mean right lol!

OMG Look at Lucy's eyes lol!!!! BTW you might not see it but I colored her ears extra pink to go with her crossed arms :)

That's my sophie ALL DAY!!!!!

Ok let's start the process.

First you want to lay your undertone with Y26 


Then you detail and add with your E44 not so heavy in the hand so it doesn't take over.


Next go back with your Y26 to bring out the undertone just a bit more. 


 My final step would be blend  out with E41 and don’t forget to leave your highlights untouched or gently touched that would be your choice.

If you have an unsteady hand like me then go back go back and softly very softly either add more or just enhance your shading with E44.

This is my result and I preferred to touch my highlighted area with E41 but oh so lightly.


This is my what I did with her. Very simple and bright of course.


Thanks for stopping by and make sure to come back for a HOP that will take place on the 15th which starts here.

I'll be sharing CHA PICTURES everyday when I get a chance to jump in here so look out for that too.

I have so much to share but I can't leak pictures just yet but once CHA is over we're bringing down the house with new projects posting all the time whoot whoot, lol!

Ok signing off your girl Ruby

MIC PRODUCT


SKIN: E000, E11, E13,W1,W5, R20,R32
DRESS: G12,YG63,YG67, BG05, BG78, R32,V000,V01
HAIR: Y26, E41, E44